Long lived SSH keys have always been a very real attack vector for EC2 instances, mostly because of the need to share and manage those keys between people and teams. This has been a constant headache for people trying to keep their environments secure, and the announcement of EC2 Instance Connect for SSH access looks like it’s going to be the solution that takes the headache away.
AWS previously promoted using Session Manager in AWS Systems Manager to run a browser-based interactive shell for accessing EC2 instances. Although this was a better solution, it never really felt like a great solution, which is where EC2 Instance Connect comes in, with what seems like a much more thought out and simplified solution1. Amazon sums up the benefits to their customers security posture as follows:
- Centralized access control – You get centralized access control to your EC2 instances on a per-user and per-instance level. IAM policies and principals remove the need to share and manage SSH keys.
- Short-lived keys – SSH keys are not persisted on the instance, but are ephemeral in nature. They are only accessible by an instance at the time that an authorized user connects, making it easier to grant or revoke access in real time. This also allows you to move away from long-lived keys. Instead, you generate one-time SSH keys each time that an authorized user connects, eliminating the need to track and maintain keys.
- Auditability – User connections via EC2 Instance Connect are logged to AWS CloudTrail, providing the visibility needed to easily audit connection requests and maintain compliance.
- Ubiquitous access – EC2 Instance Connect works seamlessly with your existing SSH client. You can also connect to your instances from a new browser-based SSH client in the EC2 console, providing a consistent experience without having to change your workflows or tools.
This sounds like a great solution, but before we dive in and see what it looks like in practice, let’s just take a quick look at how it works.

Setting up EC2 Instance Connect
As of June 2019, Amazon Linux 2 instances come preconfigured with EC2 Instance Connect, however for all other supported Linux distributions we need to enable Instance Connect on a per instance basis. Talking of supported distributions, the list is currently quite limited - any version of Amazon Linux 2 and Ubuntu 16.04 or later. I’ll stick with Amazon Linux 2 for the rest of this post, and point out any differences along the way if you’re doing this on Ubuntu.
Installing is pretty straight forward:
sudo yum install ec2-instance-connect
Or for Ubuntu:
sudo apt-get install ec2-instance-connect
To verify the install, you can check that the following new files appear in /opt/aws/bin/ (for Ubuntu, you’ll find the files in /usr/share/ec2-instance-connect/).
eic_curl_authorized_keys
eic_harvest_hostkeys
eic_parse_authorized_keys
eic_run_authorized_keys
You will also need to ensure that your instance(s) allow inbound SSH traffic from the corresponding AWS IP Address Ranges for the EC2_INSTANCE_CONNECT service, not just your external IP address.
IAM Permissions
In order for an IAM user to connect to an instance, they will need permission to push the public key to the instance. The following policy document provides the required permissions for someone to connect using either the AWS Console / SSH client or the EC2 Instance Connect CLI.
{
	"Version": "2012-10-17",
	"Statement": [{
			"Effect": "Allow",
			"Action": "ec2-instance-connect:SendSSHPublicKey",
			"Resource": "arn:aws:ec2:region:account-id:instance/i-instance-id",
			"Condition": {
				"StringEquals": {
					"ec2:osuser": "ami-username"
				}
			}
		},
		{
			"Effect": "Allow",
			"Action": "ec2:DescribeInstances",
			"Resource": "*"
		}
	]
}
A couple of points since there are some new permissions that have been introduced and some things you’ll need to change in your own policies:
- The
ec2-instance-connect:SendSSHPublicKeyaction grants an IAM user permission to push the public key to an instance. - The ec2:osuser condition specifies the default user name for the AMI that you used to launch your instance -
ec2-userfor Amazon Linux 2, andubuntufor the Ubuntu AMI. You will need to change the valueami-usernameto whatever is appropriate in your environment. - You’ll need to update the resource
arn:aws:ec2:region:account-id:instance/i-instance-idwith your own values. - The
ec2:DescribeInstancesaction is required when using EC2 Instance Connect CLI because the wrapper makes a describe call at the first step.
Connecting to Instances
Now we’ve set up the instance and have the right permissions assigned, we should be able to go ahead and connect to the instance using any of these instances described here.
From the Console
This is a simple method, which just required you to choose the appropriate connection method for your instance.
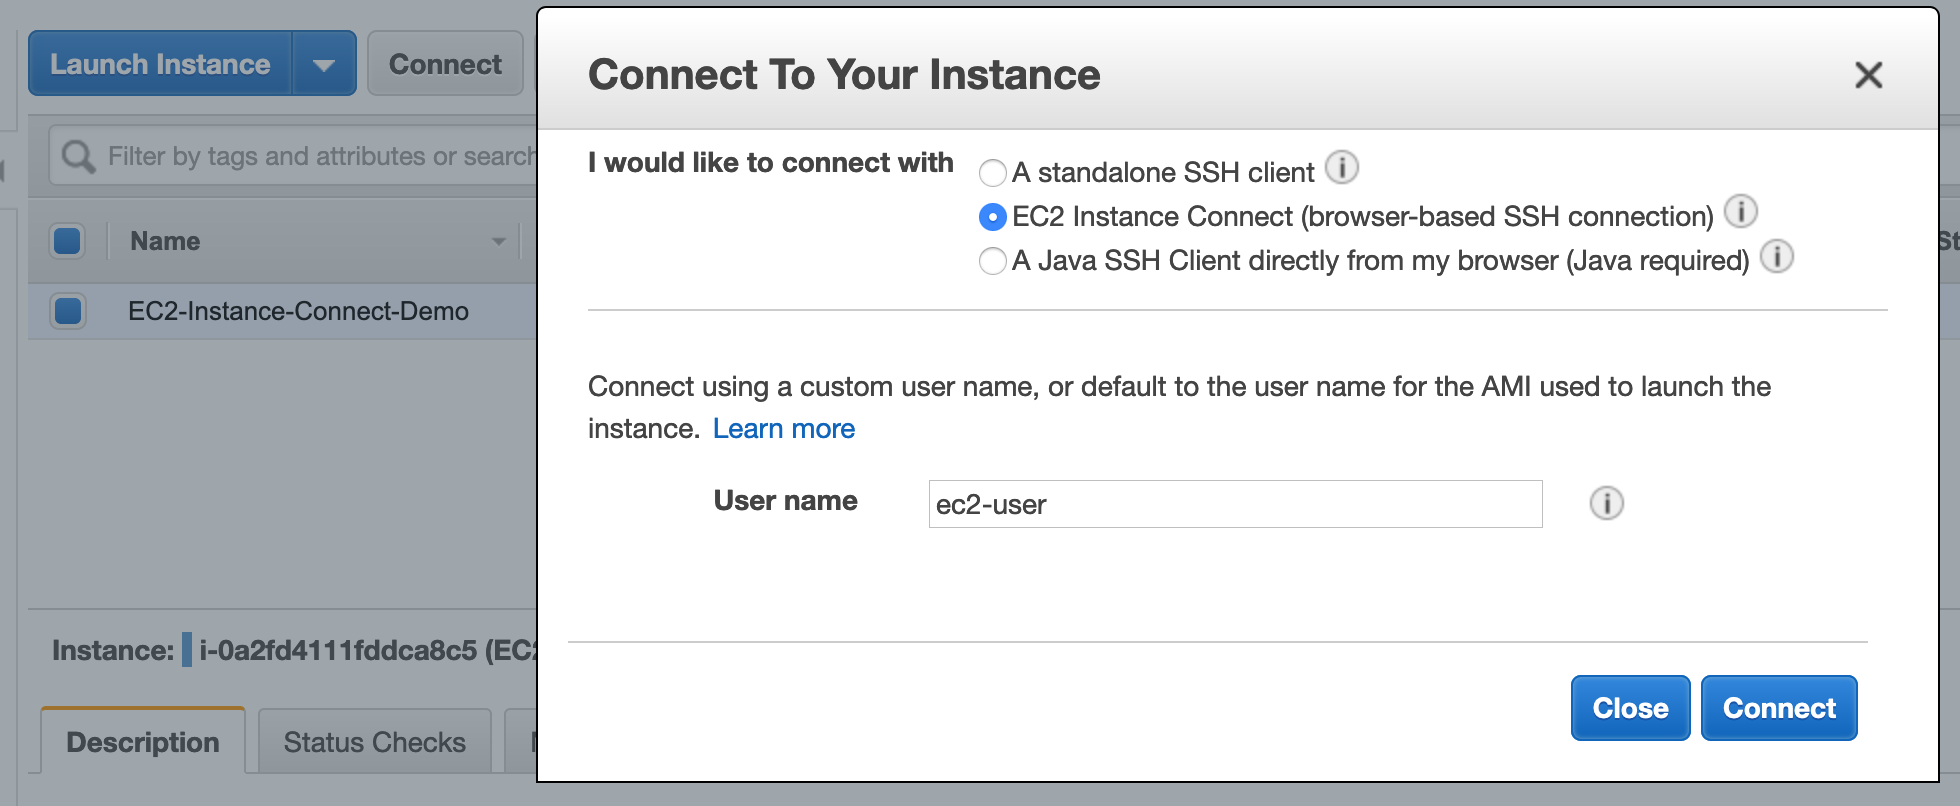
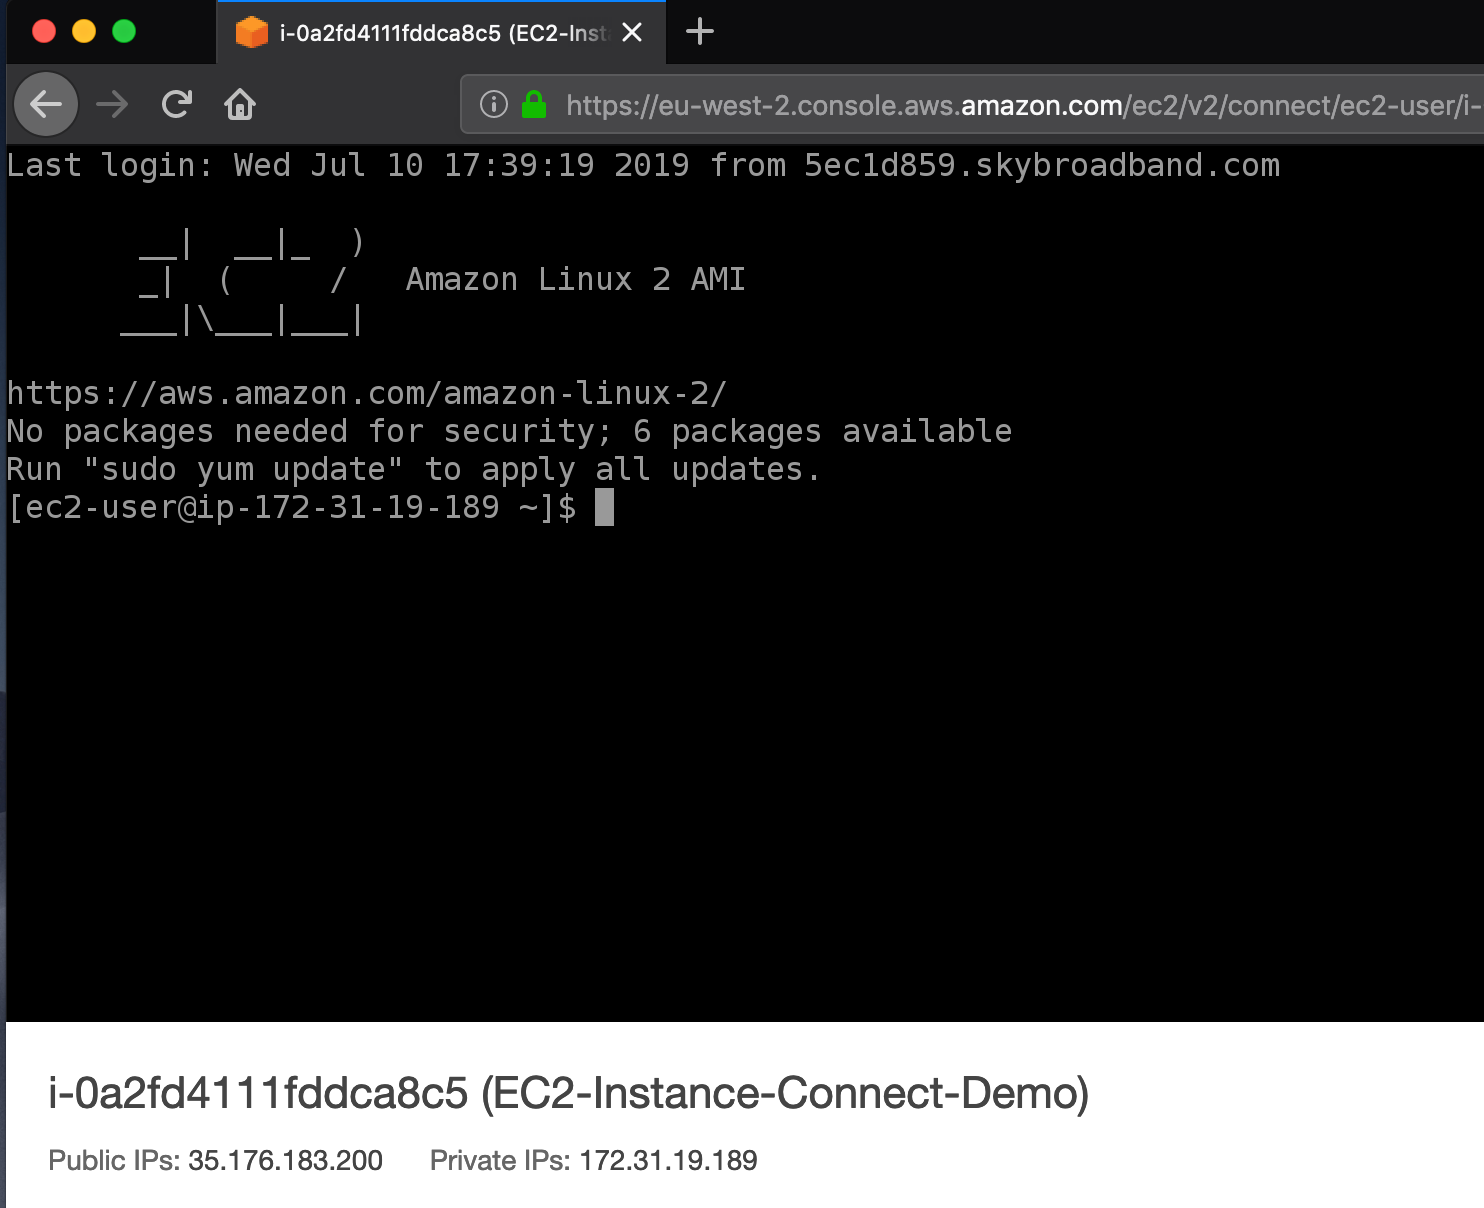
The result is a browser based interactive console, which looks like a good option for one-time use cases.
Using the CLI
Before you can use this option, you’ll need to install the EC2 Instance Connect CLI, which contains a single command - mssh instance_id. When issuing the command, three actions are initiated from the call:
- Generation of a one-time-use SSH public key
- The key is pushed to the instance metadata, where it remains for 60 seconds
- The user is connected to the instance
To install the Instance Connect CLI package, you’ll need to perform the following actions.
- Download the latest
ec2instanceconnectcli-latest.tar.gzpackage from S3
aws s3api get-object --bucket ec2-instance-connect --key cli/ec2instanceconnectcli-latest.tar.gz ec2instanceconnectcli-latest.tar.gz
- Using pip, install the
ec2instanceconnectcli-latest.tar.gzpackage
sudo pip install ec2instanceconnectcli-latest.tar.gz
Once installed, you can connect using the following command for Amazon Linux 2 (note that for Ubuntu, you will need to prefix the instance id with the username - mssh ubuntu@i-001234a4bf70dec41EXAMPLE)
mssh i-001234a4bf70dec41EXAMPLE
Using an SSH Client with an Existing Key
Using this method, you will first need to generate your own SSH private and public key pairs if you don’t already have a pair to use. Straight away, this puts me off this option - it lends itself to people using long-lived keys for multiple instances, which removes all of the benefits we’ve seen so far when using one-time use SSH keys.
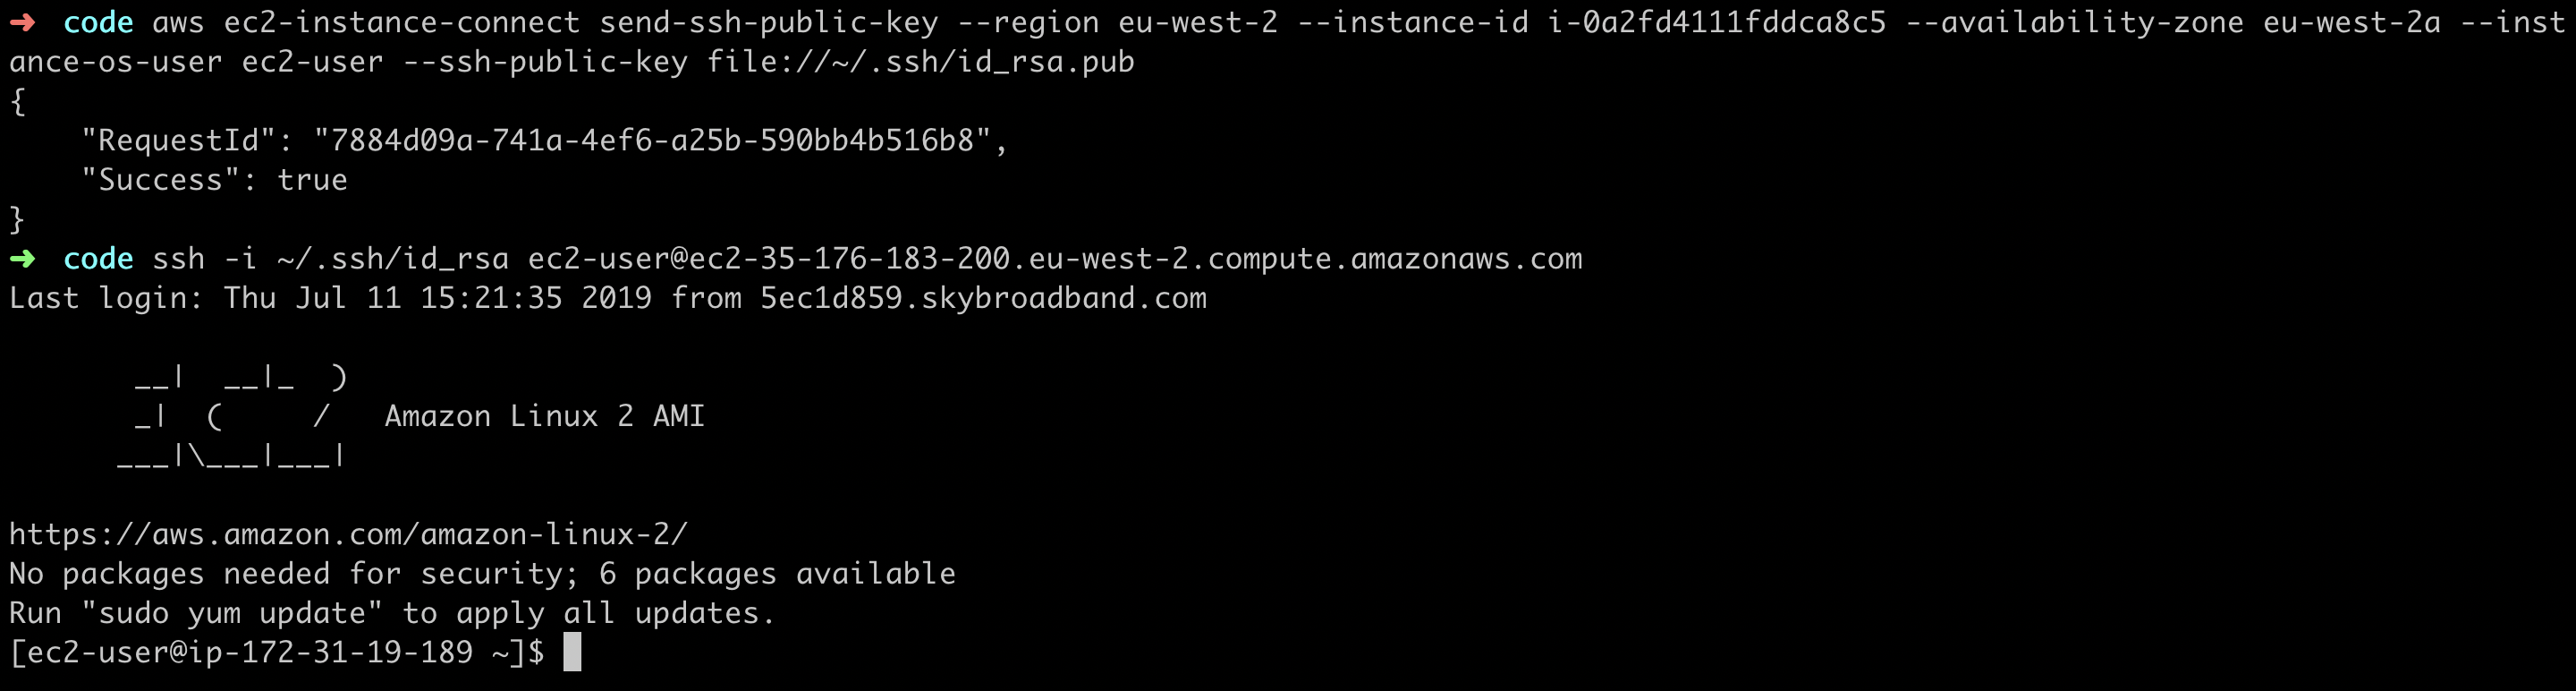
I already have a key pair available, so I’ll push the public key to the instance using the following command.
aws ec2-instance-connect send-ssh-public-key --region eu-west-2 --instance-id i-0a2fd4111fddca8c5 --availability-zone eu-west-2a --instance-os-user ec2-user --ssh-public-key file://~/.ssh/id_rsa.pub
The next step is to connect to the instance using the private key.
ssh -i ~/.ssh/id_rsa ec2-user@ec2-35-176-183-200.eu-west-2.compute.amazonaws.com
As with the other methods, it’s seamless - but again, I’m not sure about this options in terms of maximising your security posture.
Auditability
As promised, every connection is logged in CloudTrail, which is a great feature to have built-in rather than have to configure yourself on individual accounts. The following shows the final connection that we made.
{
    "eventVersion": "1.05",
    "userIdentity": {
        "type": "IAMUser",
        "principalId": "AKIAIOSFODNN7EXAMPLE",
        "arn": "arn:aws:iam::123456789012:user/username",
        "accountId": "123456789012",
        "accessKeyId": "AKIAIOSFODNN7EXAMPLE",
        "userName": "username",
        "sessionContext": {
            "attributes": {
                "mfaAuthenticated": "false",
                "creationDate": "2019-07-11T15:46:38Z"
            }
        }
    },
    "eventTime": "2019-07-11T15:46:38Z",
    "eventSource": "ec2-instance-connect.amazonaws.com",
    "eventName": "SendSSHPublicKey",
    "awsRegion": "eu-west-2",
    "sourceIPAddress": "xx.xx.xx.xx",
    "userAgent": "aws-cli/1.16.188 Python/3.7.3 Darwin/18.6.0 botocore/1.12.186",
    "requestParameters": {
        "instanceId": "i-0a2fd4111fddca8c5",
        "osUser": "ec2-user",
        "SSHKey": {
            "publicKey": "ssh-rsa AAAAB3N......"
        }
    },
    "responseElements": null,
    "requestID": "7884d09a-741a-4ef6-a25b-590bb4b516b8",
    "eventID": "62d0d3f3-f7e8-451b-b0b7-f048adf053c3",
    "eventType": "AwsApiCall",
    "recipientAccountId": "123456789012"
}
Automation
Enabling Instance Connect on a per instance basis sounds like a lot of hassle. You’re probably replacing instances on at least a semi-regular basis, which means that you could add this into whatever build process you have.
For example, you could use an SSM document and tagging strategy to install the Instance Connect package based on the AMI. Alternatively. you could bake it into you current image or script it into your deployment process
-
It’s worth noting that SSM’s Session Manager is still the only way to connect to an interactive CLI on a Windows EC2 Instance. ↩